Ben McCann

Co-founder of Connectifier.
Investor at C3 Ventures.
Google and CMU alum.

Ben McCann on LinkedIn Ben McCann on AngelList Ben McCann on Twitter

Include CSS or JS first in your HTML page for best performance?

09/05/2020

I was recently having a discussion with Rich Harris about performance optimizations for CSS and JS handling. A few questions came up for which I didn’t have a good answer. One of those is whether the old advice that you should include and load CSS first in your HTML page for best performance was still true today. The best answer I found was a StackOverflow thread from 2012 where folks who really knew this stuff like Jeff Atwood and Steve Souders were participating. It turns out that even in 2012 that was pretty old advice as Josh Dague provided some detailed information and benchmarking, which suggested it was better to put JS first on desktop and CSS first on mobile.

At the time speculative parsing was still very new and it appeared that even the newest version of WebKit for Android did not appear to support it. I was skeptical that WebKit hadn’t advanced in the eight years since then, so decided to test for myself. The easiest site I had access to test on was c3.ventures, which includes jQuery and Bootstrap JavaScript as well as Bootstrap and webfonts CSS, so it seemed like a reasonable test.

The first thing I wanted to test was whether the assets could be downloaded in parallel on mobile or the blocking behavior from 2012 was still present. I took some time to figure out how to connect the Android debugger to Chrome mobile, and it turns out that things had changed!
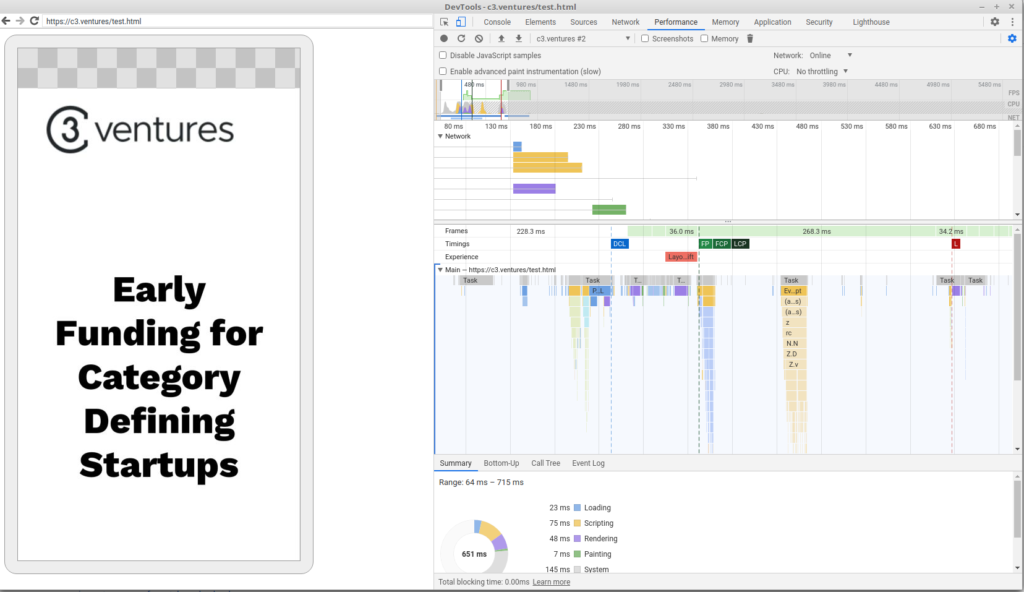
In 2020, JS and CSS are downloaded in parallel even on mobile
(yellow and purple bars on top)

The next step was to time the page render over several runs.

CSS FirstJS First
Mean280.1277.8 ms
Standard Deviation21.9 ms56.8 ms
Largest Contentful Paint of c3.ventures on Chrome for Android. n=15

It turns out it really doesn’t make much of a difference, at least in this case. The page layout is fairly simple and perhaps I’d have gotten a different answer on a more complex page. But as of right now, I can’t say that one is better than the other in any statistically significant way. It’s probably a much better idea to focus your efforts on more significant changes.

Ergonomics

01/22/2017

Being on the computer forces your shoulders forward and together. A split keyboard helps bring your shoulders back into a natural position. I recommend the Kinesis Freestyle 2, but there are quite a few alternatives on the market like the Ultimate Hacking Keyboard and KeyMouse.

There’s a lot of research about how sitting all day is harmful to your health. E.g. a 2010 study in the American Journal of Epidemiology tracked 123,000 adults over 14 years and found that those who sat more than six hours per day had an 18 percent higher mortality rate than those who sat less than three hours. Treadmill desks are a really great way to combat this. The only one I’ve used is the Lifespan TR1200-DT3, which is one of the most popular and I’ve had a great experience with it. Walking on the treadmill can be a little noisy. It’s generally not bad, but at higher speeds I sometimes like to wear a pair of noise cancelling headphones.

Sit-stand desks work best with treadmills since they allow you to alternate between walking and sitting. iMovr makes several made to be used with treadmills such as the iMovR Everest. It has a tilting keyboard tray, which does feel much more natural and is very steady when using a keyboard. The downside is that it isn’t quite wide enough to be used with a split keyboard like the Kinesis. The other downside is that the mouse doesn’t fit on the keyboard tray, so is placed on the desk. This means it’s higher than keyboard, which is unnatural and places extra strain on shoulder. Overall it’s a good desk though and a titled mousepad can help angle the mouse at the same angle as the keyboard and make it more comfortable to use. You can even stack two on top of each other to increase the angle if necessary.

How SBT does dependency resolution

04/13/2016

SBT uses its own fork of Ivy to do dependency resolution. The code to do this resolution is split between a few classes such as ConvertResolver.

I’ve posted below an excerpt of what SBT does. It uses a chained resolver, which I’ve simplified here to use a single resolver for demonstration purposes.

IvySettings settings = new IvySettings();
ResolveEngine engine = new ResolveEngine(settings, new EventManager(), new SortEngine(settings));
ResolveData data = new ResolveData(engine, new ResolveOptions());
IBiblioResolver resolver = new IBiblioResolver();
resolver.setRoot("https://repo1.maven.org/maven2");
resolver.setName("central");
resolver.setM2compatible(true);
resolver.setSettings(settings);

settings.addResolver(resolver);
settings.setDefaultResolver("central");

ModuleRevisionId mrid = ModuleRevisionId.newInstance("commons-cli", "commons-cli", "1.3.1");
ResolvedModuleRevision resolved = resolver.getDependency(new DefaultDependencyDescriptor(mrid, true), data);

System.out.println("Resolved: " + resolved);

Setting up Mac OSX

03/08/2016

Install Homebrew. It will fail to install packages by default due to issues writing to /usr/local. To fix this:

sudo chmod -R g+w /usr/local

Make hidden files visible in the Finder:

defaults write com.apple.finder AppleShowAllFiles TRUE
killall Finder

Change the following settings using the Mac system preferences to make the trackpad usable:

  • Key Repeat – all the way long
  • Delay Until Repeat – all the way short
  • Tracking speed – faster

Install Karabiner, so that you can remap keys. Note that Karabiner doesn’t yet work in OS X Sierra. You can either use Karabiner Elements on Sierra or swap Ctrl and Command in System Preferences->Keyboard->Modifier Keys…

Go to “Misc & Uninstall” then click “Open private.xml”. Paste the code below. Switch back to the main tab “Change Key” and hit “Reload XML”. Now check “Swap Command and Control unless tabbing through windows”. Also check “Disable all settings while you are using Remote Desktop or VNC”.


<!—
 The autogen format is:
   new keys
   original keys
—>

<?xml version="1.0"?>
<root>
  <item>
    <name>Swap Command and Control unless tabbing through windows</name>
    <identifier>private.ben_hates_macs</identifier>
    <autogen>
      __KeyToKey__
      KeyCode::TAB, ModifierFlag::CONTROL_L,
      KeyCode::TAB, ModifierFlag::COMMAND_L
    </autogen>
    <autogen>
      __KeyToKey__
      KeyCode::TAB, ModifierFlag::COMMAND_L,
      KeyCode::TAB, ModifierFlag::CONTROL_L
    </autogen>
    <autogen>
      __KeyToKey__
      KeyCode::BACKQUOTE, ModifierFlag::CONTROL_L,
      KeyCode::BACKQUOTE, ModifierFlag::COMMAND_L
    </autogen>
    <autogen>
      __KeyToKey__
      KeyCode::BACKQUOTE, ModifierFlag::COMMAND_L,
      KeyCode::BACKQUOTE, ModifierFlag::CONTROL_L
    </autogen>
    <autogen>
      __KeyToKey__
      KeyCode::COMMAND_L,
      KeyCode::CONTROL_L
    </autogen>
    <autogen>
      __KeyToKey__
      KeyCode::CONTROL_L,
      KeyCode::COMMAND_L
    </autogen>
  </item>
</root>

OAuth in a command line script

08/05/2015

Many APIs today use OAuth. If you want to use an OAuth API from the command line, then what I recommend is starting a web server locally to handle the OAuth callback. Here’s a quick and dirty example of doing that in Python.

#!/usr/bin/env python

from flask import Flask,redirect, request
import json
import logging
import threading
import time
from urlparse import urlparse
import urllib
import urllib2
import webbrowser

CLIENT_ID = 'xxxx'
CLIENT_SECRET = 'yyyyyyyy'

SCOPE = 'repo:read'
AUTH_URL = 'https://quay.io/oauth/authorize'
IMAGES_URL = 'https://quay.io/api/v1/repository/myorg/myrepo/image/'

oauth_access_token = None

app = Flask(__name__)

@app.route('/oauth_request_token')
def oauth_request_token():
  url = 'https://quay.io/oauth/authorize?response_type=token&redirect_uri=' + urllib.quote('http://localhost:7777/oauth_callback') + '&realm=realm&client_id=' + urllib.quote(CLIENT_ID) + '&scope=' + urllib.quote(SCOPE)
  print 'Redirecting to ' + url
  return redirect(url)

@app.route('/oauth_callback')
def oauth_callback():
  result = """
  <script>
    getHashParams = function() {
      var hashParams = {};
      var e,
        a = /\+/g,  // Regex for replacing addition symbol with a space
        r = /([^&;=]+)=?([^&;]*)/g,
        d = function (s) { return decodeURIComponent(s.replace(a, " ")); },
        q = window.location.hash.substring(1);

      while (e = r.exec(q))
        hashParams[d(e[1])] = d(e[2]);
      return hashParams;
    };
    
    ajax = function(url, callback, data) {
      try {
        var x = new(this.XMLHttpRequest || ActiveXObject)('MSXML2.XMLHTTP.3.0');
        x.open(data ? 'POST' : 'GET', url, 1);
        x.setRequestHeader('X-Requested-With', 'XMLHttpRequest');
        x.setRequestHeader('Content-type', 'application/x-www-form-urlencoded');
        x.onreadystatechange = function () {
            x.readyState > 3 && callback && callback(x.responseText, x);
        };
        x.send(data)
      } catch (e) {
        window.console && console.log(e);
      }
    };

    hashParams = getHashParams();
    ajax('/receive_token', function() { window.close(); }, 'access_token=' + hashParams['access_token']);
  </script>
  """
  return result

@app.route('/receive_token', methods=['POST'])
def receive_token():
  global oauth_access_token
  oauth_access_token = request.form['access_token']
  return '{}'

class ServerThread(threading.Thread):

  def __init__(self):
    threading.Thread.__init__(self)

  def run(self):
    app.run(
      port=7777,
      host='localhost'
    )

if '__main__'==__name__:
  logging.getLogger().addHandler(logging.StreamHandler())

  thread = ServerThread()
  thread.daemon = True
  thread.start()

  webbrowser.open('http://localhost:7777/oauth_request_token')

  while oauth_access_token is None:
    time.sleep(0.2)

  print 'Retreived auth code ' + oauth_access_token

  opener = urllib2.build_opener()
  opener.addheaders = [('Authorization', 'Bearer ' + oauth_access_token)]
  images = opener.open(IMAGES_URL)
  print images.read()

Building Docker images with SBT

07/26/2015

A typical way to setup Jenkins is to connect it to your source repository (e.g. with the Git Plugin), run your tests after each commit, and then build a package for deployment when the tests pass. We’ll use SBT’s sbt-native-packager for this last step, which allows you to package your applications in numerous different formats including zip, deb, rpm, dmg, msi, and docker.

To setup sbt-native-packager to publish you Docker images you need to add sbt-native-packager to your project and specify your Docker repo in your build.sbt. E.g. dockerRepository := Some("quay.io/myorganization"). You now need to setup the credentials to publish to your Docker repository. This typically goes in ~/.dockercfg. You can place the .dockercfg in the Jenkins home directory, which on Ubuntu will by default be located at /var/lib/jenkins/.

The next thing you need to setup is the build step to build the Docker image. This can be a bit confusing because Jenkins has build steps and post-build actions and it’s not completely clear what the difference is. I’ve found that the build step does what we want. You can use the Jenkins SBT Plugin to run your sbt tests with each commit. Now, to build a Docker image you can click “Add build step” followed by “Build using sbt” and in the Actions field enter “docker:publish”

Another thing you may need to deal with is having SBT sub-projects. E.g. let’s assume you have a project named “myproj”, which depends on other libraries. You can set "project myproj" docker:publish in the Jenkins build step so that SBT switches to your myproj project before building the docker image, so that it won’t try to run docker:publish on your subprojects. If you’re using SBT’s aggregation to compile or run the tests of these sub-projects when doing the same for myproj, you’re probably going to want to disable this for publishing the Docker image. You can do this by adding the setting aggregate in Docker := false to your build.sbt:

lazy val myproj = project
    .enablePlugins(DockerPlugin, GitVersioning, PlayJava, SbtWeb)
    .dependsOn(subproj).aggregate(subproj)
    .settings(
      aggregate in Docker := false  // when building Docker image, don't build images for sub-projects
    )

Note that you’ll have to handle garbage collection of old Docker images. Docker has this on their roadmap. Until then, I recommend Spotify’s Docker GC.

MongoDB data migration

07/07/2015

Here is some benchmarking data regarding transferring data from one machine to another. These benchmarks were run on the AWS i2 instance class.

  • mongodump – 15min / 100GB
  • gzip using pigz – 15min/100GB
  • network transfer – 20min/100GB
  • extract archive – 30min/100GB
  • mongorestore -j 12 – 2hr/100GB

Injecting JUnit tests with Guice using a Rule

05/04/2015

GuiceBerry is a pretty helpful library for injecting JUnit tests with Guice. However, it’s not super actively maintained and many of it’s methods and members are private making it difficult to change it’s behavior. Here’s a class, which essentially does what GuiceBerry does in one single class that you can edit yourself.

import org.junit.rules.MethodRule;
import org.junit.runners.model.FrameworkMethod;
import org.junit.runners.model.Statement;

import com.connectifier.data.mongodb.MongoConnection;
import com.connectifier.data.mongodb.MongoDBConfig;
import com.google.inject.Guice;
import com.google.inject.Injector;
import com.google.inject.Module;
import com.mongodb.DB;
import com.mongodb.MongoClientOptions;

public class DbRule implements MethodRule  {

  private final Injector injector;
  
  public DbRule(Class envClass) {
    try {
      this.injector = Guice.createInjector(envClass.newInstance());
    } catch (InstantiationException | IllegalAccessException e) {
      throw new IllegalStateException(e);
    }
  }
  
  @Override
  public Statement apply(Statement base, FrameworkMethod method, Object target) {
    return new Statement() {
      @Override
      public void evaluate() throws Throwable {
        try {
          injector.injectMembers(target);
          base.evaluate();
        } finally {
          runAfterTest();
        }
      }
    };
  }

  protected void runAfterTest() {
    DB db = MongoConnectionFactory.createDatabaseConnection(
        injector.getInstance(MongoDBConfig.class),
        injector.getInstance(MongoClientOptions.class));
    db.dropDatabase();
    db.getMongo().close();
  }

};

To use:

  @Rule
  public final DbRule env = new DbRule(DataEnv.class);

IntelliJ Setup

05/04/2015

The font rendering on IntelliJ is horrendous and makes you want to gouge your eyes out. This is because is uses Swing. In order to make this not completely horrible, you’ll need to install tuxjdk, which contains series of patches to OpenJDK to enhance user experience with Java-based and Swing-based tools. I also recommend installing the Monokai Sublime Text 3 theme.

If you install the Lombok plugin, then you’ll also need to set: Settings > Build …. > Compiler > Annotation Processing > Enable Annotation Processors

Formatting a Disk on Amazon EC2

02/10/2015

The following commands will format and mount your disk on a newly created EC2 machine:

sudo mkfs -t ext4 /dev/xvdb 
sudo mkdir /storage
sudo sed -i '\|^/dev/xvdb| d' /etc/fstab # delete existing entry if it exists
sudo sh -c 'echo "/dev/xvdb /storage ext4 defaults,nobootwait,noatime,nodiratime 0 2" >> /etc/fstab'
sudo mount -a
Older Posts