Ben McCann

Co-founder of Connectifier.
Investor at C3 Ventures.
Google and CMU alum.

Ben McCann on LinkedIn Ben McCann on AngelList Ben McCann on Twitter

HTML Parsing using the Firefox DLLs

03/21/2008

One of my first posts was a comparison of HTML parsers. Today I found a particularly challenging document to parse. None of the parsers I had compared earlier were able to handle the malformed HTML in this table where the td elements were prematurely ended. The behavior of Neko and HtmlCleaner made the most sense (while still failing to clean the document) while the output from TagSoup and jTidy was a bit more strange.

However, I noticed that FireBug parsed the document correctly. So I did a bit of research into how I’d be able to use Firefox’s HTML parsing and found a project called Mozilla Parser that had been put together to do just that. Its setup is not quite as nice as the others, but is well documented. Follow the quick start to begin with. Then when you get to the portion where you write actual Java code you may want to follow the example below as it appears the API has been updated since the documentation was posted.

final String BASE_PATH = "C:\\Documents and Settings\\bjm733\\My Documents\\workspace\\MozillaHtmlParser\\";

try {
	File parserLibraryFile = new File(BASE_PATH + "native" + File.separator + "bin" + File.separator + "MozillaParser" + EnviromentController.getSharedLibraryExtension());
	String parseLibrary = parserLibraryFile.getAbsolutePath();
	MozillaParser.init(parseLibrary, BASE_PATH + "mozilla.dist.bin."+EnviromentController.getOperatingSystemName());
	MozillaParser parser = new MozillaParser();
	document = parser.parse("<html><body>hello world</body></html>");
} catch(Exception e) {
	e.printStackTrace();
}

The most unfortunate thing about this approach is that it is not pure Java, which can be a deal breaker in many situations. Also it’s not well maintained with responsive developers.

Change the NetBeans Default JDK

03/04/2008

A client sent me some code today to update. He was using the NetBeans, so I downloaded the IDE and fired it up to open the project he’d sent me. Unfortunately, the project wouldn’t compile because he’d written the code in Java 6 while NetBeans was using Java 5. I couldn’t find a NetBeans menu to update the setting, but rather found that the fix is to add the following in NetBean’s etc/netbeans.conf file:

# Default location of JDK, can be overridden by using --jdkhome <dir>:
netbeans_jdkhome="C:\Program Files\Java\jdk1.6.0_05"

Intro to URL Rewriting with Apache’s .htaccess

02/28/2008

I have created an .htaccess file to do URL rewriting for every site I’ve ever created. If you’re not familiar with URL rewriting, it is used to modify a URL or redirect the user before the requested resource is fetched. One of its major uses is to make URLs human readable. That means your users can visit a pretty URL like http://www.mystore.com/shoes/ and have it interpreted by the server as http://www.mystore.com/shop.php?category=shoes.

Most of the time, this file can be relatively simple. I would always recommend using one for URL canonicalization, which is a fancy term for making sure you have one unique URL for each page. For example, lumidant.com redirects to www.lumidant.com. This is beneficial for SEO because you want to ensure that search engines don’t split your ranking points between pages that are actually one and the same.

The code below is the .htaccess file from this site. The declarations in the file are regular expressions, which you might need to get a quick refresher on if you’re not familiar with. A few other things to be aware of include the fact that [NC] stands for no case and means that the text is not case-sensitive, [R=301] tells the server to do a 301 redirect, and [L] tells the server it can quit there and and not bother processing the rest of the file.

<IfModule mod_rewrite.c>

  RewriteEngine on

  # rewrite all lumidant.com requests to the lumidant subdirectory
  RewriteCond %{HTTP_HOST} ^(www\.)?lumidant\.com$
  # this is needed to stop infinite looping
  RewriteCond %{REQUEST_URI} !^/lumidant/.*$
  # don't redirect these directories to the lumidant subdirectory
  RewriteCond %{REQUEST_URI} !^/pinknews/.*$
  RewriteRule ^(.*)$ /lumidant/$1

  # if you're asking for a directory and there is no trailing slash then add one
  RewriteCond %{REQUEST_FILENAME} -d
  RewriteCond %{REQUEST_URI} !^.*/$
  RewriteRule ^/lumidant/(.*)$ http://www\.lumidant\.com%{REQUEST_URI}/ [R=301,L]

  # add a www if there's not one
  RewriteCond %{HTTP_HOST} ^lumidant\.com$ [NC]
  RewriteCond %{REQUEST_URI} !^/blog.*$
  RewriteRule ^lumidant/(.*)$ http://www\.lumidant\.com/$1 [R=301,L]

</IfModule>

This blog is currently hosted with BlueHost. For accounts with multiple domains, BlueHost places the add-on domains in subdirectories of the main domain. This can be confusing to maintain, so I moved all of the lumidant code to a subdirectory as well and then updated the .htaccess file to make this organization transparent to the end user.

The last few lines add a www to all non-www pages. While I could have placed this at the beginning of the file, the file would be executed again after the redirect causing possibly another redirect to be executed if a trailing slash needed to be added. Keep in mind while organizing the file that you’d like to minimize the number of redirects for many reasons including response times, reducing server load, and optimizing for search engines.

URL rewriting can be tricky at first, especially if you’re not familiar with regular expressions. If you’re working with redirections, then it may help to check the HTTP headers of your request to see what intermediate redirects are occurring.

Finally, if you’re not using Apache there are other alternatives to .htaccess. For example, I have used the UrlRewriteFilter in the past for Java web apps.

Suppressing Compile Warnings with Java Annotations

02/23/2008

If you’ve used Java 1.5 Generics much then you’re probably familiar with the following compile warning: “Type safety: The expression of type List needs unchecked conversion to conform to List<String>” or similar. It turns out there’s a rather simple solution with annotations to ignore this problem:

@SuppressWarnings(“unchecked”)

A couple other possible uses of the annotation that might be of interest are:

@SuppressWarnings(“deprecation”)
@SuppressWarnings(“serial”)

These are compiler specific, so you may want to check out the full Eclipse list, which is a bit lengthier than Sun’s 7 options (all, deprecation, unchecked, fallthrough, path, serial, and finally).

Also, multiple statements can be combined into one as follows:

@SuppressWarnings({“unchecked”, “deprecation”})

Apache CXF Tutorial – WS-Security with Spring

02/19/2008

This tutorial will cover adding an authentication component to your web service though WS-Security. If you need an overview of how to setup CXF then you may find our previous tutorial helpful. Another helpful resource is CXF’s own WS-Security tutorial. However, it does not include information on how to setup the client through Spring.

To begin with, make sure you have at least the following .jars in addition to the required base CXF .jars:

spring-beans-2.0.6.jar
spring-context-2.0.6.jar
spring-core-2.0.6.jar
spring-web-2.0.6.jar
wss4j-1.5.1.jar
xmlsec-1.3.0.jar

Now we will add a security interceptor to the server’s Spring configuration file, which we named cxf.xml in the last tutorial in order to match the CXF documentation.

<beans xmlns="http://www.springframework.org/schema/beans"
      xmlns:xsi="http://www.w3.org/2001/XMLSchema-instance"
      xmlns:jaxws="http://cxf.apache.org/jaxws"
      xsi:schemaLocation="http://www.springframework.org/schema/beans
                          http://www.springframework.org/schema/beans/spring-beans.xsd
                          http://cxf.apache.org/jaxws
                          http://cxf.apache.org/schemas/jaxws.xsd">

  <import resource="classpath:META-INF/cxf/cxf.xml" />
  <import resource="classpath:META-INF/cxf/cxf-extension-soap.xml"/>
  <import resource="classpath:META-INF/cxf/cxf-servlet.xml" />

  <jaxws:endpoint id="auth"
                  implementor="com.company.auth.service.AuthServiceImpl"
                  address="/corporateAuth">

    <jaxws:inInterceptors>
      <bean class="org.apache.cxf.binding.soap.saaj.SAAJInInterceptor" />
      <bean class="org.apache.cxf.ws.security.wss4j.WSS4JInInterceptor">
        <constructor-arg>
          <map>
            <entry key="action" value="UsernameToken" />
            <entry key="passwordType" value="PasswordText" />
            <entry key="passwordCallbackClass" value="com.company.auth.service.ServerPasswordCallback" />
          </map>
        </constructor-arg>
      </bean>
    </jaxws:inInterceptors>

  </jaxws:endpoint>

</beans>

You can change the action and passwordType to do more advanced authentication. In this example, we will simply require all authenticating clients to know a single password specified by the server. If you’d like each client to have it’s own password you can specify that in the callback, which is the next thing we must implement:

package com.company.auth.service;

import java.io.IOException;
import java.util.ResourceBundle;

import javax.security.auth.callback.Callback;
import javax.security.auth.callback.CallbackHandler;
import javax.security.auth.callback.UnsupportedCallbackException;

import org.apache.ws.security.WSPasswordCallback;

public class ServerPasswordCallback implements CallbackHandler {

    private static final String BUNDLE_LOCATION = "com.company.auth.authServer";
    private static final String PASSWORD_PROPERTY_NAME = "auth.manager.password";

    private static String password;
    static {
        final ResourceBundle bundle = ResourceBundle.getBundle(BUNDLE_LOCATION);
        password = bundle.getString(PASSWORD_PROPERTY_NAME);
    }

    public void handle(Callback[] callbacks) throws IOException, UnsupportedCallbackException {

        WSPasswordCallback pc = (WSPasswordCallback) callbacks[0];

        // Set the password on the callback. This will be compared to the
        //     password which was sent from the client.
        // We can call pc.getIdentifer() right here to check the username
        //     if we want each client to have it's own password.
        pc.setPassword(password);
    }

}

The server is now setup to require a password. The password we are requiring is one that we specified in a properties file and then read in through a ResourceBundle. You may find it easier to simply hard code the password on the initial run and then replace it with your own means of authentication once the service is up and running.

If you are running on WebLogic 9, as I was, then you will get an error “java.lang.UnsupportedOperationException: This class does not support SAAJ 1.1“. In order to correct that, make sure your version of the SAAJ classes are being used by adding the following to your weblogic.xml descriptor file:

<container-descriptor>
    <prefer-web-inf-classes>true</prefer-web-inf-classes>
</container-descriptor>

You WebLogic folks must also then set two properties in your WebLogic JDK:

-Djavax.xml.soap.MessageFactory=com.sun.xml.messaging.saaj.soap.ver1_1.SOAPMessageFactory1_1Impl
-Djavax.xml.soap.SOAPConnectionFactory=weblogic.wsee.saaj.SOAPConnectionFactoryImpl

We now have to setup the client to supply a password. Firstly, we will create another Spring file at com/company/auth/service/cxfClient.xml to setup the application context for the client:

<beans xmlns="http://www.springframework.org/schema/beans"
  xmlns:xsi="http://www.w3.org/2001/XMLSchema-instance"
  xmlns:jaxws="http://cxf.apache.org/jaxws"
  xsi:schemaLocation="http://www.springframework.org/schema/beans http://www.springframework.org/schema/beans/spring-beans-2.0.xsd
                      http://cxf.apache.org/jaxws http://cxf.apache.org/schemas/jaxws.xsd">

  <bean id="proxyFactory" class="org.apache.cxf.jaxws.JaxWsProxyFactoryBean">
    <property name="serviceClass" value="com.company.auth.service.AuthService"/>
    <property name="address" value="http://localhost:7001/authManager/services/corporateAuth"/>
    <property name="inInterceptors">
      <list>
        <ref bean="logIn" />
      </list>
    </property>
    <property name="outInterceptors">
      <list>
        <ref bean="logOut" />
        <ref bean="saajOut" />
        <ref bean="wss4jOut" />
      </list>
    </property>
  </bean>

  <bean id="client" class="org.apache.cxf.jaxws.JaxWsProxyFactoryBean" factory-bean="proxyFactory" factory-method="create" />

  <bean id="logIn" class="org.apache.cxf.interceptor.LoggingInInterceptor" />
  <bean id="logOut" class="org.apache.cxf.interceptor.LoggingOutInterceptor" />
  <bean id="saajOut" class="org.apache.cxf.binding.soap.saaj.SAAJOutInterceptor" />
  <bean id="wss4jOut" class="org.apache.cxf.ws.security.wss4j.WSS4JOutInterceptor">
    <constructor-arg>
      <map>
        <entry key="action" value="UsernameToken" />
        <entry key="user" value="ws-client" />
        <entry key="passwordType" value="PasswordText" />
        <entry key="passwordCallbackClass" value="com.company.auth.service.ClientPasswordCallback" />
      </map>
    </constructor-arg>
  </bean>    

</beans>

We then need to set the password for our message:

package com.company.auth.service;

import java.io.IOException;
import java.util.ResourceBundle;

import javax.security.auth.callback.Callback;
import javax.security.auth.callback.CallbackHandler;
import javax.security.auth.callback.UnsupportedCallbackException;

import org.apache.ws.security.WSPasswordCallback;

public class ClientPasswordCallback implements CallbackHandler {

    private static final String BUNDLE_LOCATION = "com.company.auth.authClient";
    private static final String PASSWORD_PROPERTY_NAME = "auth.manager.password";	

    private static String password;
    static {
        final ResourceBundle bundle = ResourceBundle.getBundle(BUNDLE_LOCATION);
        password = bundle.getString(PASSWORD_PROPERTY_NAME);
    }	

    public void handle(Callback[] callbacks) throws IOException, UnsupportedCallbackException {

        WSPasswordCallback pc = (WSPasswordCallback) callbacks[0];

        // set the password for our message.
        pc.setPassword(password);
    }

}

Finally, we create the service factory, which is extremely easy since all the work was done in the Spring file:

package com.company.auth.service;

import org.springframework.context.support.ClassPathXmlApplicationContext;

public final class AuthServiceFactory {

    private static final ClassPathXmlApplicationContext context = new ClassPathXmlApplicationContext(new String[] {
                "com/company/auth/service/cxfClient.xml"
            });

    public AuthServiceFactory() {
    }

    public AuthService getService() {
        return (AuthService) context.getBean("client");
    }
}

Congratulations. Your web service now utilizes a basic implementation of WS-Security. Hopefully, that will be enough background to get you on your way.

Adding Links for Navigation to the WordPress Pages List

02/18/2008

The category titled “Pages” on the right-hand side of this blog is an area where WordPress will allow a user to create wiki pages. However, I wanted to include some navigational links in that area as well, which isn’t immediately available through the WordPress admin screens.

The solution I found was to create a new blogroll category and use it for navigational links. First off, I modified the call to wp_list_pages by adding the argument “title_li=0”, which tells WordPress not to wrap it in <ul> tags, but to instead only output the <li> tags. Then I wrapped the call with my own <ul> tags. Finally, I called wp_list_bookmarks in order to display the category I had created, which had an id of 34. I again used the “title_li=0” parameter and also had to add “categorize=0”, so that this parameter would not be ignored:

<li id="pages">
	<h2><?php _e('Pages'); ?></h2>
	<ul>
		<?php wp_list_bookmarks('categorize=0&title_li=0&category=34'); ?>
		<?php wp_list_pages('title_li=0'); ?>
	</ul>
</li>

hCard Microformat Example

02/13/2008

What exactly is an hCard? It’s a format which specifies that some information on a web page is an online business card. The address for Lumidant in the page footer is an hCard. This means when someone with the Operator Firefox extension visits this page they will have the opportunity to do a one-click import of Lumidant’s address and URL into their contact book. And that can’t hurt business. Come Firefox 3, this functionality will be available without extensions. Creating an hCard was pretty simple. All I had to do was add specific class names to my HTML elements:

<div id="address" class="vcard">
  <a class="fn org url" href="http://www.lumidant.com" title="Lumidant | Cleveland Web Design and Development">
    Lumidant LLC
  </a>
  ·
  <span class="adr">
    <span class="street-address">1220 West Sixth Street</span> |
    <span class="extended-address">Suite 506</span> |
    <span class="locality">Cleveland</span>,
    <span class="region">OH</span>
    <span class="postal-code">44113</span>
  </span>
  · <a href="blog/">Blog</a>
</div>

Screenshots of Scrolling Web Pages

02/11/2008

Have you ever wanted to take a screenshot of a web page that won’t fit on a single page?  I wanted to do that for a client today and found a handy utility that will do it for you.  TechSmith’s SnagIt makes the process far easier that taking multiple screenshots and stitching the panorama together in your favorite photo editor.  Unfortunately, it is not free, but there is a 30-day free trial.  If you’re a mac user there is a program called Paparazzi that
is free and will do the same thing.

Rounded Corners with JavaScript and CSS – No Images

02/11/2008

Rounded corners can create nice presentational effects and are very popular in web design. They also are a bit of a pain to create because they usually require PhotoShop and the markup is not as straightforward as square corners. So I was excited to give Steffen Rusitschka’s method a try, which uses only JavaScript and CSS and is quite feature full. His ShadedBorders library looks quite nice in Firefox. However, my test did not perform as well in IE6. Strangely, once you mouse over the afflicted area, the problem corrects itself. Here are the before and after shots:

Buggy Rounded Corners in IE Properly Formatted Rounded Corners

Hopefully this problem will be fixed as I am quite interested in the library. I will be sure to test future versions and in the meantime may investigate potential workarounds for the problem.

Gradient Web 2.0 Effects with GIMP

02/10/2008

In my last post, I mentioned that I installed GIMP to read a Photoshop .psd file. If you’re not familiar with GIMP, it is an extremely high quality free alternative to Photoshop. Using GIMP, I have been able to create several graphical effects with little effort. In this post, I will show you how I created the logos for Lumidant and Moon Rock Media using GIMP.

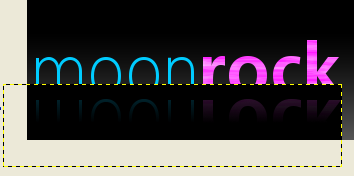
Moon Rock came to us and wanted a “cliché web 2.0 design”. Basically that means they were asking for gradients, mirrored surfaces, reflections, and shiny or glossy images. To begin the logo, I created a gradient background. Select one color of gray as the foreground and another as the background. Then choose the gradient tool and drag it vertically from the top of the image to the bottom. Play around with this for a little to get a feel for the tool. Once that was completed, I used the text tool to write moon in blue and then rock in pink. I then chose the dodge/burn tool to alternately dodge and burn the pink letters:

Moonrock Logo - Text Only

Once I was certain the text was how I wanted, I stacked the two text layers to become a single layer, making them easier to work with. To mirror the text, you simply Duplicate Layer and then Flip Vertically. Position it below the original text. Now, under the transparency menu, Add Alpha Channel to the layer. This will allow us to make use of transparency. If the option was grayed out, then your layer already has an alpha channel, so you can just continue to the next step. The final step is to create another gradient effect. We want to use the gradient to hide the portion of the reflection we don’t want to see. I changed the foreground to black. Most importantly, you must click the picture of the gradient you’re creating in the gradient tool options and select “FG to Transparent”. Now drag the gradient tool up vertically over the text. This will hide most of the text with a black gradient:

Moonrock Logo with Black Gradient Hiding Reflection

Since we don’t want the black to show in the final logo, select Color to Alpha and choose black. Now the black will have disappeared leaving you with a finished reflection effect:

Moon Rock Media Logo

In the Lumidant logo on the Lumidant homepage, the lighthouse searchlight or spotlight was also created using gradient effects. To create a spotlight, first create a new layer. This is important because we will duplicate the layer later and only want the spotlight itself duplicated. Draw the outline of the light you’d like to create by using the paths tool. I created the light by drawing a long triangle. After you have drawn the third point and would like to connect back to the first, hold Ctrl and click on the first point. This will close the shape. Then hold Ctrl, click on the short side of the triangle, and drag it outwards. This will round the end of the light. Turn the shape into a selection by clicking “Selection from Path”:

Lumidant Logo with Searchlight Path Drawn

Now, we get to use the gradient tool again. Having created the spotlight-shaped selection, we can draw inside the selection and nothing outside of it will be affected. Select white and “FG to Transparent”. Drag the gradient tool from the point of the triangle to the end of the rounded section. Now Duplicate Layer. Add a 4px Gaussian Blur filter to one of the layers. In the “Layers, Channels, Paths, Undo” menu bar (referred to as a dialog by GIMP), select the layer that you blurred and move the opacity down to 80. Now choose the original spotlight layer and move the opacity down to 20. Hooray! You’ve just created an awesome looking spotlight.

Newer Posts
Older Posts