Ben McCann

Co-founder of Connectifier.
Investor at C3 Ventures.
Google and CMU alum.

Ben McCann on LinkedIn Ben McCann on AngelList Ben McCann on Twitter

Automated Play Framework Testing with Jenkins

11/26/2013

Jenkins automates builds and tests. This post describes setting up Jenkins for the Play 2 Framework.

First off, you need a machine with a good amount of resources. I tried first on a small cloud machine with 2GB of RAM and it was not sufficient, so get a machine with 4GB of RAM.

Next you need to install Java and SBT. Also, git if you use it for source control.

sudo add-apt-repository ppa:webupd8team/java
echo "deb http://dl.bintray.com/sbt/debian /" | sudo tee -a /etc/apt/sources.list.d/sbt.list
sudo apt-get update
sudo apt-get install git oracle-java8-installer sbt

Now that you have Java installed, you can install Jenkins:

wget -q -O - http://pkg.jenkins-ci.org/debian/jenkins-ci.org.key | sudo apt-key add -
sudo sh -c 'echo deb http://pkg.jenkins-ci.org/debian binary/ > /etc/apt/sources.list.d/jenkins.list'
sudo apt-get update
sudo apt-get install jenkins

To be able to have Jenkins check the source code out of GitHub or BitBucket, you need to setup an SSH deploy key. First create an SSH key:

sudo su jenkins
ssh-keygen -t rsa
$ cat /var/lib/jenkins/.ssh/id_rsa.pub

Copy the key into GitHub/BitBucket as a deploy key.

Accept the remote host as a machine to trust connections to:

ls-remote -h git@host:org/repo.git HEAD

Now go to the Jenkins web UI. First, Install Jenkins GIT plugin and Jenkins sbt plugin.

Then, setup the system configuration under “Manage” > “Configure System”. Point the sbt plugin to the launcher jar we installed earlier at /usr/share/sbt/bin/sbt-launch.jar.

You’ll also want to set some type of notification of failed builds. Set the “System Admin e-mail address” under “Jenkins Location”, which will be the email address you will receive alerts from and set the SMTP host, username, and password under “E-mail Notification”. I recommend installing the Email Extension Plugin in order to be able to customize the emails that you’ll receive. You can then set project to use Editable Email Notification as a Post-build Action. With the Email Extension Plugin, you’ll need to choose Advanced Settings… and then select Recipients or else your emails won’t go to the recipients you’ve specified. This frustrating option should not exist let alone be unselected by default. To include the build log in the email you can add ${BUILD_LOG,maxLines=10000}. I also suggest adding a trigger so that you get notified both on failed builds and also when the build is fixed.

At this point, you can create a “New Job” selecting “Build a free-style software project”. Enter your git repo location, how often to build, and set it to build with sbt. Enjoy!

Installing Mesos and Marathon on Ubuntu

11/23/2013

Mesos is a distributed task framework. Marathon runs long-running tasks on Mesos. Here’s how you can install the latest versions.

#### Dependencies: Java & Zookeeper
sudo apt-get install -y default-jdk zookeeper-bin zookeeperd
#### Install Mesos
ubuntu_version="12.04"
curl -fL "http://downloads.mesosphere.io/master/ubuntu/${ubuntu_version}/mesos_0.14.2_amd64.deb" --output mesos.deb
sudo dpkg -i mesos.deb
rm mesos.deb
#### Install Marathon
sudo mkdir -p /opt/marathon
sudo curl -fL "http://downloads.mesosphere.io/maven/mesosphere/marathon/0.2.1/marathon-0.2.1-jar-with-dependencies.jar" --output /opt/marathon/marathon.jar
sudo chmod ug+rx /opt/marathon/marathon.jar
sudo curl -fL "http://downloads.mesosphere.io/marathon/marathon.conf" --output /etc/init/marathon.conf

You should be able to start all services at this point either by rebooting or manually:

sudo initctl reload-configuration
sudo start zookeeper
sudo start mesos-master
sudo start mesos-slave
sudo start marathon

If it worked you’ll be able to load the marathon administration page at http://localhost:8080/.

I ran into a problem where I was getting the error messages mesos-master: error while loading shared libraries: libjvm.so: cannot open shared object file: No such file or directory and java.lang.UnsatisfiedLinkError: no mesos in java.library.path. I had installed OpenJDK via the package openjdk-7-jdk. Installing default-jdk fixes this by symlinking libjvm.so in /usr/lib.

Running ElasticSearch in Production

08/20/2013

ElasticSearch is a very awesome tool with very awful documentation.

One thing you’ll need to be sure to do is update the ES_HEAP_SIZE in your /etc/init.d/elasticsearch to use half your system’s memory in production. The default will give you awful performance.

TOTAL_MEM_K=`grep MemTotal /proc/meminfo | awk '{print $2}' `
HALF_MEM_K=$((TOTAL_MEM_K / 2))
ES_HEAP_SIZE="${HALF_MEM_K}k"

tmux tutorial

04/24/2013

tmux is a cool tool that allows you to have multiple screens within a single terminal and to have persistent SSH sessions. The documentation and most tutorials are horribly complex, but it’s actually not that hard to use the basic functionality.

Start a new session with:

tmux new

Detach your session with:

tmux detach

Reattach your session after detaching or having your SSH session die:

tmux attach -d

Read more on Josh Clayton’s blog.

If you’d like to use ssh key forwarding (i.e. ssh -A) with tmux you’ll need to create a new session as opposed to attaching to an existing session.

Setting up NX

03/26/2013

I wanted a remote graphical environment on a machine in the cloud. It’s very easy to download No Machine’s NX and install it. You’ll also have to run sudo apt-get install ubuntu-desktop unity-2d gdm if you’re on a server, since the server install doesn’t come with a graphical environment by default.

NX 4

Note that you can’t use Ubuntu’s Unity desktop with NX, so you’ll have to install an alternate desktop environment and update your NX configs.

If you run into a problem with the lock screen rejecting your password then you can fix it with it:

sudo chown root:shadow /sbin/unix_chkpwd
sudo chmod 2755 /sbin/unix_chkpwd
sudo chown root:shadow /etc/shadow
sudo chmod g+r /etc/shadow

If you get the message “Your evaluation period has expired” or similar, you can solve that by uninstalling NX, deleting /usr/NX, and then re-installing /usr/NX

If you get the message “Could not locate the ssh client at ‘C:\Program Files (x86)\NoMachine\bin\nxssh.exe'” then it’s because you’ve installed the free version of NX which does not support SSH, so you’ll need to install the pro version.

NX 3

To run unity-2d with NX 3, you’ll need to hit “Configure…” and then in the “Desktop” section, select “Unix” and “Custom”, press “Settings…”, choose “Run the following command”, fill in “gnome-session –session=ubuntu-2d”, and set the “New virtual desktop” option.

Securing NX 3

You can increase the security over the default NX installation, by following these instructions :

  • Download and install the client, node, and server in that order
  • In /etc/ssh/sshd_config add the nx user by setting AllowUsers nx and restart the ssh daemon sudo /etc/init.d/ssh restart.
  • NX uses a deprecated location for the ssh authorized_keys file, so you must fix that or you will get a public key authentication failed error. Open /usr/NX/etc/server.cfg and change #SSHAuthorizedKeys = "authorized_keys2" to SSHAuthorizedKeys = "authorized_keys". Now run sudo mv /usr/NX/home/nx/.ssh/authorized_keys2 /usr/NX/home/nx/.ssh/authorized_keys if there’s an authorized_key2 file present.
  • Run sudo /usr/NX/scripts/setup/nxserver –install
  • If you’ve disabled SSH passwords then you’ll also need to set EnableUserDB = "1" and EnablePasswordDB = "1" in /usr/NX/etc/server.cfg and then run sudo /usr/NX/bin/nxserver –useradd $USER since we’ve disabled passwords when we locked down SSH.
  • Change the default NX key.  Run sudo /usr/NX/bin/nxserver –keygen.  In your NX client, open “Configure…” > “General” tab > “Key …” and copy the contents of “/usr/NX/share/keys/default.id_dsa.key” into the key window and save it.
  • Optional for connecting to multiple servers at once:  Change DisplayBase in /usr/NX/etc/server.cfg.
  • Restart the NX server to pickup your changes: sudo /etc/init.d/nxserver restart

Using Ruby on Ubuntu

02/02/2013

Do not use sudo apt-get install ruby-rvm to install the RVM that comes with Ubuntu because it will not work well.

First, be sure to setup the terminal to work with RVM.

Now you can install RVM and Ruby:

gpg --keyserver hkp://keys.gnupg.net --recv-keys 409B6B1796C275462A1703113804BB82D39DC0E3
curl -sSL https://get.rvm.io | bash -s stable --ruby
ruby -v

A common thing to do at the point is install bundler, which is Ruby’s dependency manager, and use it to install your project’s dependencies and then run rake.

gem install bundler
bundle install
rake

Connecting to SoftLayer VPN on Ubuntu

12/09/2012

SoftLayer has a private network which is accessible only via VPN. It took me a really long time to figure out how to connect on Ubuntu 12.04 running on VirtualBox.

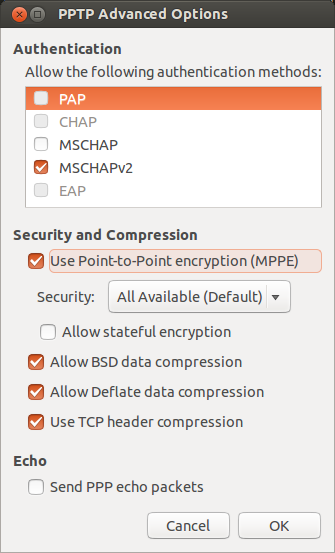
To configure the VPN connection, from the network manager icon in the top right corner click: “VPN Connections” > “Configure VPN…”. Use a PPTP VPN, enter the gateway, set the username and password, and then under “Advanced…” uncheck all the authentication methods except MSCHAPv2 and check “Use Point-to-Point encryption (MPPE)”

ubuntu_vpn_advanced_dialogue

If you’re running under VirtualBox then you’ll need to update the “Network” tab to use the attached to “Bridged Adapter” setting instead of the default “NAT”.

Custom OS install on SoftLayer

10/31/2012

SoftLayer will allow to setup a handful of OS images by default, but requires you to jump through extra hoops if you’d like to provide your own ISO or go through the OS install screens yourself. For example, this is most likely the way you’d install LVM if you’d like to backup your database via LVM snapshots.

You’ll first need to put the ISO in your lockbox, which you can find details for from the hardware page for your instance:

benmccann@mongo2:~$ wget http://releases.ubuntu.com/12.04/ubuntu-12.04.1-server-amd64.iso
benmccann@mongo2:~$ ftp lockbox01.service.softlayer.com
Name (lockbox501.service.softlayer.com:benmccann): SLLBXXXXXX-X
331 Password required for SLLBXXXXXX-X
Password:
230 User SLLBXXXXXX-X logged in
ftp> put ubuntu-12.04.1-server-amd64.iso

Next you’ll need to mount the image on your instance. Go to the hardware page for the instance you’re using and click the “IPMI address” link. Connect to the PPTP VPN and then paste the “Remote Mgmt IP” in the URL bar of your browser and enter the accompanying username and password. Go to “Virtual Media” > “CD-ROM Image”. Ping your lockbox to get its IP address since the DNS name will not work here.

$ ping lockbox01.service.softlayer.com
PING lockbox01.service.softlayer.com (10.1.194.50) 56(84) bytes of data.

Enter the details making sure to use the IP address instead of hostname and to include the lockbox username in your path:

Share host: 10.1.194.50
Path to image: \SLLBXXXXXX-X\ubuntu-12.04.1-server-amd64.iso
User: SLLBXXXXXX-X
Password: ********

At this point you’ll need to file a ticket with SoftLayer to change the boot order of your machine to boot off the CD instead of the hard drive. You should probably go ahead and try the next step, but then just be aware if the machine boots up without giving you the option to install the new OS then the support ticket will be required.

From the page where you got the IP address, username, and password for the IPMI web console, you can get instructions for downloading IPMIView and connecting to your instance. Do “File” > “New…” > “System” and after you connect click on the “KVM Console” tab then “Launch KVM Console”. Now click to the “IPM Device” tab and reset the machine. At this point you should see your machine in the KVM window and you can install your OS.

Newer Posts
Older Posts