Ben McCann

Co-founder of Connectifier.
Investor at C3 Ventures.
Google and CMU alum.

Ben McCann on LinkedIn Ben McCann on AngelList Ben McCann on Twitter

Struts 2 Tutorial – Creating Views

09/09/2008

One of the first things you’ll want to do after getting started with Struts 2 is create more complex user interfaces. We call the UI a view because Struts2 makes use of the Model-View-Controller (MVC) design pattern.  For this example, let’s assume we have an action that returns a list of all the employees at our company:

package com.lumidant.tutorial.struts2.action;

import com.opensymphony.xwork2.ActionSupport;
import com.lumidant.tutorial.struts.dao.*;
import com.lumidant.tutorial.struts.model.*;

public class ExampleAction extends ActionSupport {

    private static final long SerialVersionUID = 1L;
    private List<Employee> employees;

    public String execute() throw Exception {
        EmployeeDao dao = new EmployeeDao();
        employees = dao.getAllEmployees();
        return SUCCESS;
    }

    public List<Employee> getEmployees() {
        return employees;
    }

}

Now let’s create a page that iterates through our list of employees and prints each employee’s name in alternating row colors:

<%@ taglib prefix="s" uri="/struts-tags" %>

<html>
  <head>
    <title>Struts 2 Tutorial Example</title>
    <style type="text/css">
      .odd td { background-color: #fff; }
      .even td { background-color: #eee; }
    </style>
  </head>
  <body>
    <h2>All Employees:</h2>
    <table>
      <s:iterator value="employees" status="rowstatus">
        <tr <s:if test="#rowstatus.odd">class="odd"</s:if><s:else>class="even"</s:else>>
          <td class="fn n">
            <span class="given-name"><s:property value="firstName" /></span>
            <span class="additional-name"><s:property value="middleName" /></span>
            <span class="family-name"><s:property value="lastName" /></span>
          </td>
        </tr>
      </s:iterator>
    </table>
  </body>
</html>

What we just demonstrated is a fairly common use case and should provide a good example for doing the same in the future.  Also notice our use of the if tag and the rowstatus variable. If we wanted to put a comma after every item except the last we could do something like:

<s:if test="!#rowstatus.last">,</s:if>

Another common use case is to access the session from within the view.  For example, you may want to show a link only to logged in users.  Again, we will use OGNL to accomplish this.

<s:if test="%{#session.user.isAdmin()}">
  <a href="Admin.action">Only Admins Should See This Link</a>
</s:if>

That should give you a pretty good idea of the basics, so we’ll move onto an internationalization example.  You’ll want to create a package.properties file in the directory where your actions reside:

form.label.firstName=First Name:
form.label.lastName=Last Name:

This file contains text for the default translation of your site.  All static text on your site should be contained in an internationalization file.  You can then include the text in your JSP with the Struts 2 text tag in the following manner: <s:text name=”form.label.firstName” />.  You can create a package.properties file for each translation and append the suffix for each translation language (and optionally country – eg. en_US). For example, below is a package_pt.properties file, which contains a Portuguese translation of our example site:

form.label.firstName=Primeiro Nome:
form.label.lastName=Último Nome:

Now when the user visits the site, Struts will detect their browser language and serve the appropriate page to them.

That should give you pretty decent idea of how to create views for your site.  Please check out our other Struts 2 tutorials for information on other aspects of Struts 2.

Struts 2 Tutorial – Getting Started

09/08/2008

Struts 2 is an MVC web development framework.  It is based off of Web Work and has far less configuration than the original Struts.  I would strongly recommend Struts 2 over Struts for new development due to the faster development times it allows.  This is a very simple example and follow up posts will be coming shortly to help you develop more complex apps with Struts 2.

Getting Started

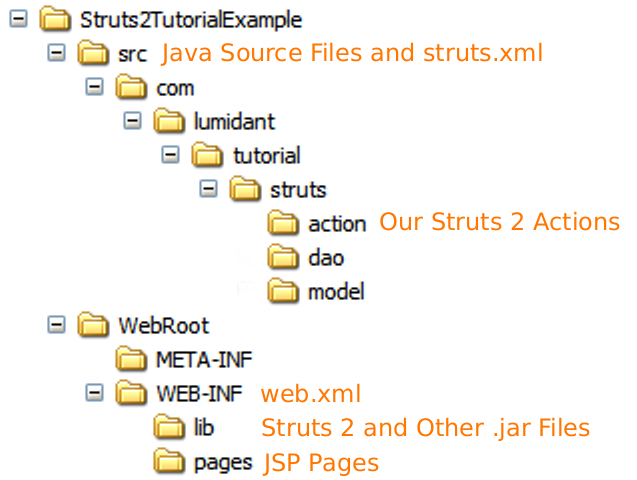
Below is an example project layout that you can use for your project.  It may be useful in helping you to decide where in your project to place your various files.

Struts 2 Project Layout

To get started, you’ll need to download the Struts libraries.  At a minimum, you will need to put the following in your WEB-INF/lib directory:

  • struts2-core.jar (The framework itself)
  • xwork.jar (Struts 2 is built on the XWork 2 framework)
  • ognl.jar (Object Graph Notation Language is used throughout the framework to access object properties)
  • freemarker.jar (Freemarker is used to create UI tag templates in Struts 2)
  • commons-logging.jar (Used to log to log4j or JDK logging)

Now we need to add a filter mapping to your web.xml file in order to have the Struts called whenever a page on your site is accessed:

<?xml version="1.0"?> <!DOCTYPE web-app PUBLIC "-//Sun Microsystems, Inc.//DTD Web Application 2.3//EN" "http://java.sun.com/dtd/web-app_2_3.dtd">

<web-app>
  <filter>
    <filter-name>struts2</filter-name>
    <filter-class>org.apache.struts2.dispatcher.FilterDispatcher</filter-class>
  </filter>

  <filter-mapping>
    <filter-name>struts2</filter-name>
    <url-pattern>/*</url-pattern>
  </filter-mapping>
</web-app>

It’s now time to make your first action.

package com.lumidant.tutorial.struts2.action;

import com.opensymphony.xwork2.ActionSupport;
import com.lumidant.tutorial.struts2.dao.*;
import com.lumidant.tutorial.struts2.model.*;

public class ExampleAction extends ActionSupport {

    private static final long SerialVersionUID = 1L;
    private String id;
    private Employee employee;

    public String execute() throw Exception {
        EmployeeDao dao = new EmployeeDao();
        employee = dao.getEmployeeById(id);
        return SUCCESS;
    }

    public Employee getEmployee() {
        return employee;
    }

    public void setId(String id) {
        this.id = id;
    }

}

There are a couple important things to note here.  The first is that our Action extends ActionSupport, which is a pattern you’ll want to continue for future actions.  Secondly, the input to our page has a setter which the framework needs to have present and the output has a getter.  Finally, our Action returns the result type SUCCESS.  The other predefined result types are ERROR, INPUT, LOGIN, and NONE.

Struts places its configuration in a struts.xml file. A good place to put it is at the root of your source folder. We’ll need to add our new action to the struts.xml file.

<!DOCTYPE struts PUBLIC "-//Apache Software Foundation//DTD Struts Configuration 2.0//EN" "http://struts.apache.org/dtds/struts-2.0.dtd">

<struts>
  <!-- Configuration for the default package. -->
  <package name="default" extends="struts-default">
    <action name="ExampleAction" class="com.lumidant.tutorial.struts.action.ExampleAction">
      <result name="success">/WEB-INF/pages/displayEmployee.jsp</result>
    </action>
  </package>
</struts>

And finally, we need to create a .jsp view for our results to be rendered in.

<%@ taglib prefix="s" uri="/struts-tags" %>

<html>
  <head>
    <title>Struts 2 Tutorial Example</title>
  </head>
  <body>
    <h2>Selected Employee:</h2>
    <span class="fn n">
      <span class="given-name"><s:property value="employee.firstName" /></span>
      <span class="additional-name"><s:property value="employee.middleName" /></span>
      <span class="family-name"><s:property value="employee.lastName" /></span>
    </span>
  </body>
</html>

The important takeaway for the view is the manner in which properties can be accessed from the view.  Struts 2 uses OGNL, which for the majority of cases means you’ll just leave the get off of your method name.  For example <s:property value=”employee.firstName” /> will call your Action’s getEmployee() method and then will call the Employee’s getFirstName() method.

So now you should have an end-to-end working example.  Depending on which application server you’re using, you should be able to access your sample page at a url like http://localhost:9090/ExampleAction.action  You’ll of course need to create some sort of dummy EmployeeDao if you’re going to use this exact example, but you should be well on your way.

You’ll also want to continue reading about Struts 2 in the continuation of this tutorial:
Struts 2 Tutorial – Creating Views
Struts 2 Tutorial – Interceptors
Struts 2 Tutorial – Struts Configuration

As an optional, but nice complement, I’d also recommend SiteMesh Tutorial with Examples.

SiteMesh Tutorial with Examples

09/07/2008

SiteMesh is a web layout framework for Java.  It differs from from frameworks such as Tiles in that it utilizes the decorator pattern.  For example, you create a number of pages and then you tell SiteMesh that you’d like to add the same header, footer, and menus to each of those pages.  This tutorial will give you a simple example of how SiteMesh can be used to give you a cleaner layout architecture and speed development times.

Start by downloading SiteMesh and adding sitemesh-2.3.jar to your WEB-INF/lib directory.  Then add the SiteMesh filter to your web.xml file like so:

<filter>
    <filter-name>sitemesh<filter-name>
    <filter-class>
        com.opensymphony.module.sitemesh.filter.PageFilter
    </filter-class>
<filter>

<filter-mapping>
    <filter-name>sitemesh<filter-name>
    <url-pattern>/*</url-pattern>
<filter-mapping>

This will call the SiteMesh filter whenever a page on your site is accessed.  Now we’ll need to create a /WEB-INF/decorators.xml file:

<decorators defaultdir="/WEB-INF/decorators">
    <decorator name="main" page="main.jsp">
        <pattern>/WEB-INF/pages/*</pattern>
    </decorator>
</decorators>

This will decorate all of the pages located under /WEB-INF/pages/ with the decorator /WEB-INF/decorators/main.jsp, which we’ll create next:

<%@ taglib prefix="decorator" uri="http://www.opensymphony.com/sitemesh/decorator" %>

<head>
  <title>
    Lumidant.com - <decorator:title default="SiteMesh Tutorial Example" />
  </title>
  <style type="text/css">@import "css/global.css";</style>
  <decorator:head />
  <body>
    <div id="header">
      <h2><a href="http://www.lumidant.com/">Lumidant.com</a> Tutorials</h2>
    </div>
    <div id="content">
      <decorator:body />
    </div>
  </body>
</html>

This decorator does a couple of things.  First off, it create an HTML title tag, which starts as “Lumidant.com – ” and then appends the title of the page that is being decorated.  If that page does not have a title tag, then a default is used to render “Lumidant.com – SiteMesh Tutorial Example”.  It then adds a global style sheet to every page being decorated and appends whatever is in that page’s head tag, which is useful for page-specific JavaScript, etc.  The decorator continues by adding a header to each page reading “Lumidant.com Tutorials” followed by the decorated page’s content.

Pretty cool, right?  If anyone is familiar with a similar decorator framework in PHP, please let me know.

Setup and Configure openSUSE 11.0

08/17/2008

Let me start off by saying that openSUSE 11.0 is the best Linux distribution I have ever used.  There are some rough edges surrounding KDE 4, but the package management in openSUSE 11.0 makes huge strides over that offered in previous versions.  If you want to get up and running with openSUSE 11.0 then there are likely a few customizations you’ll want to make.

Setup Multimedia

This is a perennial setup step on Linux distributions.  We’ll install the codecs needed to watch DVDs, handle MP3s, etc.  We’ll also setup firefox to be able to handle Windows media streams.

  1. YaST > “Software” > “Software Repositories”
  2. Click “Add”
  3. Select “Community Repositories”
  4. Select “Packman Repository” and “VideoLan Repository”
  5. YaST > “Software” > “Software Management”
  6. Uninstall xine-lib and install libxine1, w32codec-all, libdvdcss, k3b-codecs, and mplayerplug-in
  7. Open Firefox and type “about:config” into the address bar
  8. Right Click > “New” > “String”
  9. Enter “network.protocol-handler.app.mms”
  10. Enter “/opt/kde3/bin/kaffeine” (output of “which kaffeine” at command line)

Install NVIDIA drivers

If you have an NVIDIA card, then you’ll want to install the drivers.

  1. YaST > “Software” > “Software Repositories”
  2. Click “Add”
  3. Select “Community Repositories”
  4. Select “NVIDIA Repository”
  5. YaST > “Software” > “Software Management”
  6. Install “nvidia-gfxGO1-kmp-default”

Install CD ripper and ID3 tagger

For some reason, openSUSE 11.0 no longer ships with KAudioCreator or an ID3 tagger installed by default.  My guess would be that they haven’t been ported to KDE4 yet, but they’re nice to have, so we’ll go ahead and install them anyway.  We’ll also change KAudioCreator’s (stupid) default setting of not looking up CDDB information that hasn’t been cached on the local system.

  1. YaST > “Software” > “Software Repositories”
  2. Click “Add”
  3. Select “Community Repositories”
  4. Select “openSUSE BuildService – KDE:Community”
  5. YaST > “Software” > “Software Management”
  6. Install “kid3” and “kdemultimedia3-CD”
  7. Open kaudiocreator
  8. Select “Settings” > “Configure KAudioCreator …” > “CDDB”
  9. Set lookup to “Cache and remote”

Upgrade WINE

WINE is continuing to evolve and getting closer every day to reaching maturity.  You’ll likely want the latest version instead of the one that was the latest when openSUSE shipped.

  1. YaST > “Software” > “Software Repositories”
  2. Click “Add”
  3. Select “Community Repositories”
  4. Select “openSUSE BuildService – Wine CVS Builds”
  5. YaST > “Software” > “Software Management”
  6. Do a search for wine and click the check mark until version upgrade is selected

Setup a static IP address

Having a static IP address is very nice when you want to remote desktop to your server or access it in some other way without worrying about what the IP address is.  There may also need to be some configuration done on your router for this one.  Or you may prefer to investigate DHCP reservations if your router supports them.

  1. YaST > “Network Devices” > “Network Settings”
  2. Under “Overview”, select your network card and click “Edit”
  3. Enter your static IP and save it

Setup remote desktop through NX

The two main remote desktop softwares for Linux are VLC and NX.  NX is much faster and KDE’s VLC server, KRfb, is broken openSUSE 11.0.  An NX server ships with openSUSE 11.0, but we want to install at least version 3.0 in order to do desktop sharing.  We’ll also open the SSH (NX is built on top of SSH) port in the firewall so that we can connect from another machine.

  1. Download the NX Linux packages
  2. Run “rpm -iv nxclient-3.1.0-2.i386.rpm”, “rpm -iv nxnode-3.1.0-3.i386.rpm”, and “rpm -iv nxserver-3.1.0-2.i386.rpm”
  3. Run “/usr/NX/scripts/setup/nxserver –install”
  4. Run “/usr/NX/bin/nxserver –keygen”
  5. In your NX client, open “Configure…” > “General” tab > “Key …”
  6. Copy the contents of “/usr/NX/share/keys/default.id_dsa.key” into the key window and save it
  7. Open “/usr/NX/etc/server.cfg”
  8. Change line 563 from ‘EnableSessionShadowingAuthorization = “1”‘ to ‘EnableSessionShadowingAuthorization = “0”‘ which will enable you to select “Shadow” in the client under the “General” tab’s “Desktop” framebox if you’d like to do desktop sharing
  9. YaST > “Security and Users” > “Firewall” > “Allowed Services”
  10. Allow “Secure Shell Server”

Setup Network File Share using Samba

Samba allows you to share files on your computer with others on the network.

  1. YaST > “Software” > “Software Management”
  2. Install “samba” if it is not already installed
  3. YaST > “Network Services” > “Samba Server”
  4. Change sharing settings as you’d like and hit “Finish”
  5. Add a user to Samba by running “smbpasswd -a username” where username is the user you’d like to create.
  6. YaST > “Security and Users” > “Firewall” > “Allowed Services”
  7. Allow “Samba Server”

Opening a Windows Command Prompt in Windows Explorer

07/30/2008

If you’ve ever used Linux and gotten used to having a command prompt, then going back to the Windows command line is a difficult and frustrating change.  Luckily, there’s an amazing program called PowerShell that can alleviate your stress.

To open a command prompt in any directory in Windows Explorer, follow these steps to add a list item to the context menu:

  • Open up Windows Explorer
  • Click “Tools” -> “Folder Options” -> “File Types”
  • Select the “Folder” file type
  • Click “Advanced” -> “New…”
  • The Action will be displayed on the context.  For example, I entered “PowerShell Here”.
  • Now enter “C:\Windows\system32\WindowsPowerShell\v1.0\powershell.exe  -NoExit -Command Set-Location -LiteralPath ‘%L'” for the program to use or “C:\Windows\system32\cmd.exe” if you don’t have PowerShell installed.

If you want to later remove the entry from your menu and the “Remove” and “Edit…” buttons are grayed out as they were for me then you can open up regedit and delete the corresponding entry from HKEY_CLASSES_ROOT/FOLDER/shell

The equivalent of this on Ubuntu is to install the nautilus-open-terminal package.

Essential Linux Commands

07/29/2008

Getting started on Linux can be challenging.  Largely because the first time user won’t have any idea how to track down potential problems.  The following Linux commands are essential to get additional information about your system when something goes wrong.

Machine info
  • sudo lshw -html > hardware.html – Creates an HTML page showing what hardware is on your system
  • uname -mr – Shows what kernel version and processor you are running on
  • df -h and sudo fdisk -l – Gives you file system info. Can help you figure out how things are mounted
  • sudo baobab – Graphical tool to help you figure out what is using disk space. (sudo apt-get clean may help free up some space)
Logs
  • dmesg – Useful for tracking down problems during boot
  • tail -f /var/log/messages – Now run the process giving you problems and you might see helpful error messages
Processes
  • htop – Shows the programs which are the top memory and CPU users
  • dstat -nf – Shows network traffic
  • iostat -xk 2 – Shows IO statistics
  • free -m – Shows how much memory is free. Linux uses 100% memory by default so as to not waste memory by letting it sit empty. Look at the buffers/cache line to see how much is really used.
  • pgrep – Returns the process ids of a given program, allowing you to kill frozen programs
File transfer
  • scp -i key.pem local_file user@remote_machine:remote_path – Securely transfers a file
In depth
  • find – Find a file on the file system
  • sed – Programmatically edit a file or stream

If you’ve got other suggestions, please feel free to comment below.  Thanks!

Running Quicken Premier 2008 on Linux with Wine

07/27/2008

Wine attempts to create a Windows-compatible layer on top of Linux to allow you to run your favorite programs. Recently, Wine had its 1.0 release and has gotten quite strong when compared to earlier versions.  Quicken works reasonably well with wine-1.1.6 and later.

With wine-1.1.5 and earlier you’ll need to use a WINE override.  That is, you must tell Wine to use the native Windows version of gdiplus.dll:

  • Get a copy of gdiplus.dll ensuring that you adhere to any applicable licenses and put it in ~/.wine/drive_c/windows/system
  • Run winecfg
  • Hit “Add Application…” and browse to “drive_c/Program Files/Quicken/qw.exe”
  • Under the “Libraries” tab add a native override for gdiplus

Unfortunately, Quicken still cannot access the internet and there is no workaround for this since schannel, the library which implements SSL, has not yet been implemented.

If you need better debug logs for filing bugs you can set the WINEDEBUG environment variable to get more detailed output or suppress output that is overwhelming.  For example, you can put the following in your ~/.bashrc file:

export WINEDEBUG=fixme-richedit,trace+secur32

Then run “source ~/.bashrc” to reload the file.

Also, if you’d like to see the debug output scroll by on the screen as well as save it to a file then you can run the following:

wine qw.exe 2>&1 | tee trace.log

Open Windows Explorer to New Default Directory

07/27/2008

To get Windows Explorer to open to a default directory, you can create a new shortcut and modify the path. For example, the following shortcut path will open a directory of documents on a shared drive using Explorer instead of the normal window:

%SystemRoot%\explorer.exe /e,S:\Documents

Easy Java Bean toString() using BeanUtils

07/10/2008

I often want to have a String description of my beans for debugging or logging purposes, but hate having to manually concatenate the fields in my class to create a toString() method. This code snippet using Apache Commons is very helpful for just such occasions. Thanks to Paul Wilton who suggested this updated code snippet in the comments below.

public String toString() {
  return ReflectionToStringBuilder.toString(this, ToStringStyle.MULTI_LINE_STYLE);
}

Hosting Ruby on Rails on Shared Hosting at FastDomain

04/05/2008

I’ve been playing around with Ruby on Rails lately. I’m using Instant Rails as a development server locally. However, I wanted to try to publish my first Rails app to the world. I have a shared hosting account at FastDomain.com, but was having a lot of trouble getting it to work. The only error message I was given was “Application Error – Rails application failed to start properly” and I couldn’t find any informative logs. I believe that Fast Domain is run by the same people who run the more well-known BlueHost.com, so these instructions should work for that host too.

After awhile, I figured out that my problem was due to the fact that the permissions were not set properly when I FTP’d the app over. So, I deleted the app and ran “rails appname” to generate the basic rails structure. Then I copied over my app, config, and vendor/plugins directories and the relevant portions of the public directory. After that I was up and running. Make sure not to copy the entire public directory, but only the files you’ve created or edited so that you do not change the permissions of the dispatch scripts. You could also copy everything and run “chmod 755” afterwards to reset the permissions. If you’re getting a similar error and the steps I described did not help then I recommend checking out this page at Hoopla!

At this point I was up and running, but my app was sloooowwww. The solution I found was to modify the .htaccess file to ensure that fcgi was being used instead of cgi. Makes sense since the f in fcgi stands for fast. So, go to the public directory of your app and change “RewriteRule ^(.*)$ dispatch.cgi [QSA,L]” to “RewriteRule ^(.*)$ dispatch.fcgi [QSA,L]”. At this point, when I visited the site, I was shown the script source instead of having it execute. Turns out that FastDomain uses a different fcgi handler so change the first line of the script (“AddHandler fastcgi-script .fcgi”) to “AddHandler fcgid-script .fcgi” and your app will be blazing fast.

The most frustrating problem I experienced is that all of my Rails pages were being cached and static content was not.  This made updates to the site very difficult.  For example, if I updated a Rails page and a JavaScript file on that page then the two would be out of sync.  I haven’t found an easy way to clear the Ruby on Rails cache at BlueHost/FastDomain.  The answer I came up with was to run “ps -ef | grep ruby”, to find the Rails process that was running.  Then look at the pid and use it to kill the process such as “kill 24018”.

Newer Posts
Older Posts